Modifier les paramètres du compte sur la page de profil
Sur la page Profil de votre compte utilisateur, vous pouvez afficher et modifier les détails de votre profil et les paramètres système individuels. Votre profil contient vos informations personnelles, les informations de votre compte et les principaux paramètres permettant de gérer votre expérience utilisateur dans l'application.
Mettez à jour les détails de votre profil
Sur la page Profil, vous pouvez modifier les informations suivantes :
- Numéro de téléphone : définissez un numéro de téléphone associé à votre profil, qui peut être utilisé dans les notifications SMS si votre application est configurée pour envoyer des messages par téléphone.
- Langue : la langue dans laquelle l'interface Case IQ sera affichée pour votre compte.
- Thème : options de conception de l'interface utilisateur, créées par votre administrateur système.
- Option de redirection de capture de dossier : contrôle la page qui se chargera après la saisie d'un nouveau dossier (pour en savoir plus, consultez la section Option de redirection de capture de dossier ci-dessous).
- Compteur de lignes de grille par défaut de l'utilisateur : définissez le nombre par défaut d'enregistrements à afficher sur chaque page des vues de grille (voir Grilles pour en savoir plus).
- Signature : créez une signature électronique personnalisée que vous pourrez utiliser lorsque vous envoyez un e-mail depuis l'application (instructions ci-dessous dans la section Signature).
Pour mettre à jour les détails de votre profil, cliquez sur le bouton Modifier sur la page Profil. Les champs de détails du profil seront désormais modifiables afin que vous puissiez effectuer les mises à jour nécessaires. Cliquez sur le bouton Enregistrer pour enregistrer vos modifications.
Redirection de capture de dossiers
L'option Redirection de capture de dossier vous permet de choisir l'endroit où le système vous dirigera après avoir créé un nouveau dossier. L'option par défaut pour les comptes d'utilisateurs est généralement définie par votre administrateur système. Dans Profil, le menu déroulant comprend les choix suivants :
- « Itinéraire vers le dossier » : après avoir soumis un nouveau dossier, le navigateur chargera la page du dossier nouvellement créé, afin que vous puissiez interagir immédiatement avec le dossier (voir Page d'un dossier). Cette option est idéale si vous souhaitez continuer à travailler sur des dossiers immédiatement.
- « Itinéraire vers la grille des dossiers » : le navigateur ouvrira la grille des dossiers, qui résume tous les cas de l'application (voir Page Grille des dossiers). Cette option est recommandée pour les utilisateurs qui gèrent la réception des dossiers ou qui effectuent habituellement des travaux sur d'autres dossiers après avoir saisi de nouveaux dossiers.
Signature
En fonction de votre rôle dans Case IQ , vous devrez peut-être envoyer des e-mails depuis l'application de manière continue. Case IQ offre la possibilité de créer un modèle de signature électronique à ajouter facilement aux e-mails que vous rédigez et envoyez depuis l'application (voir Envoyer un e-mail dans Case IQ). Votre signature peut être générée manuellement ou automatiquement.
Pour ajouter une signature, suivez les étapes ci-dessous :
- Dans le menu Paramètres, cliquez sur l'option « Profil » pour accéder aux détails du profil.
- Cliquez sur le bouton Modifier .
- La zone de texte « Signature » au bas de la page ProfileDetails sera désormais modifiable.
- Pour créer manuellement une signature, saisissez le texte de votre signature dans la zone de texte « Signature » et dans l'éditeur.
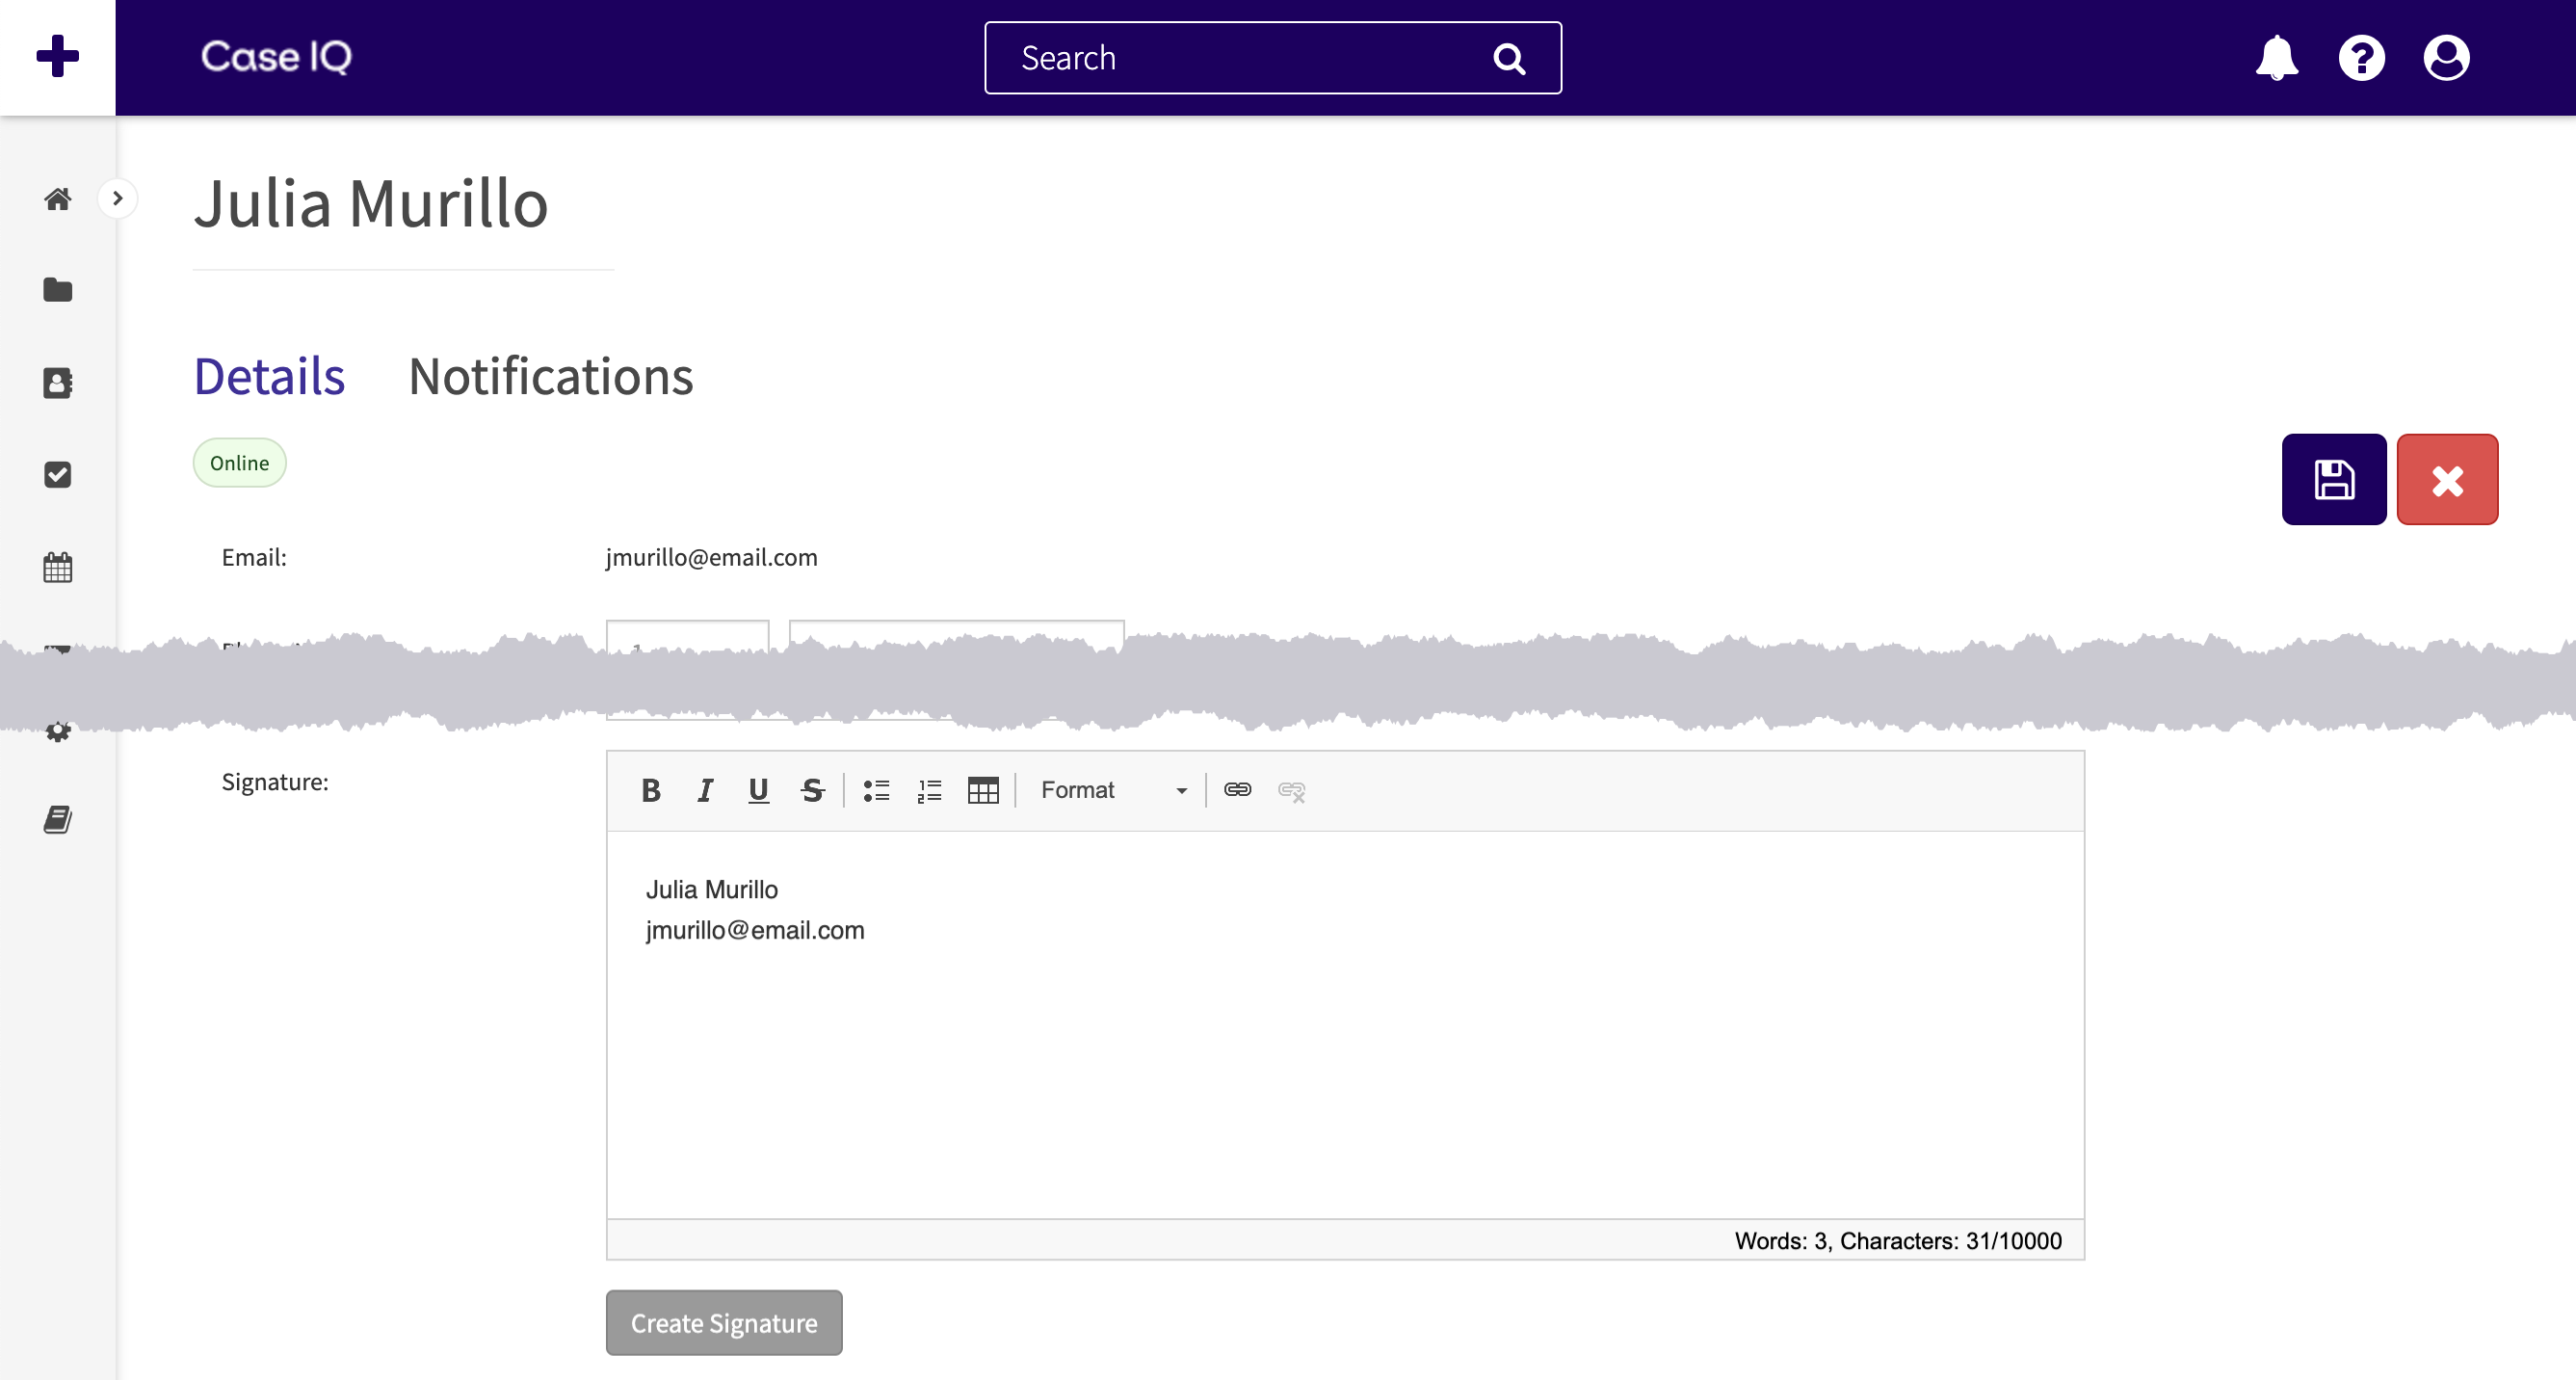
- Pour générer une signature , cliquez sur le bouton Créer une signature sous la zone de texte « Signature ». Les champs « Prénom », « Nom » et « Adresse e-mail » associés à votre compte utilisateur seront chargés dans la zone de texte « Signature ». La capture d'écran suivante montre un exemple de signature générée pour le compte de Julia Murillo :

- Case IQ prend uniquement en charge le texte des signatures. Vous ne pouvez pas ajouter de fichiers image dans la zone de texte « Signature ».
- Lorsque vous avez terminé de rédiger votre signature en utilisant l'une ou l'autre méthode, cliquez sur le bouton Enregistrer en haut de la page Détails du profil.