Configure Your Application's External Portal
In Case IQ, an external portal is a platform connected to a Case IQ application that allows reporters, such as contractors, vendors, customers, and other third parties, to submit incidents without accessing the main application. Cases added via your external portal can then be managed by investigators in Case IQ just like cases added via the main application (see Add a Case In Application) or email (see Add a Case via Email). Administrators can manage all external portal settings by navigating to Settings > System > Portal > External Portal Configuration.

Activate or Deactivate your External Portal
You can activate your external portal to make it available to reporters or deactivate it to prevent anyone from accessing it. To activate or deactivate your external portal, click the "Activate Portal" toggle on the External Portal Configuration page. Then, click Activate External Portal or Deactivate External Portal on the pop-up.

When your external portal is active, your external portal's landing page will be public, so reporters can access it and submit cases via any available reporting options.
If you deactivate your external portal:
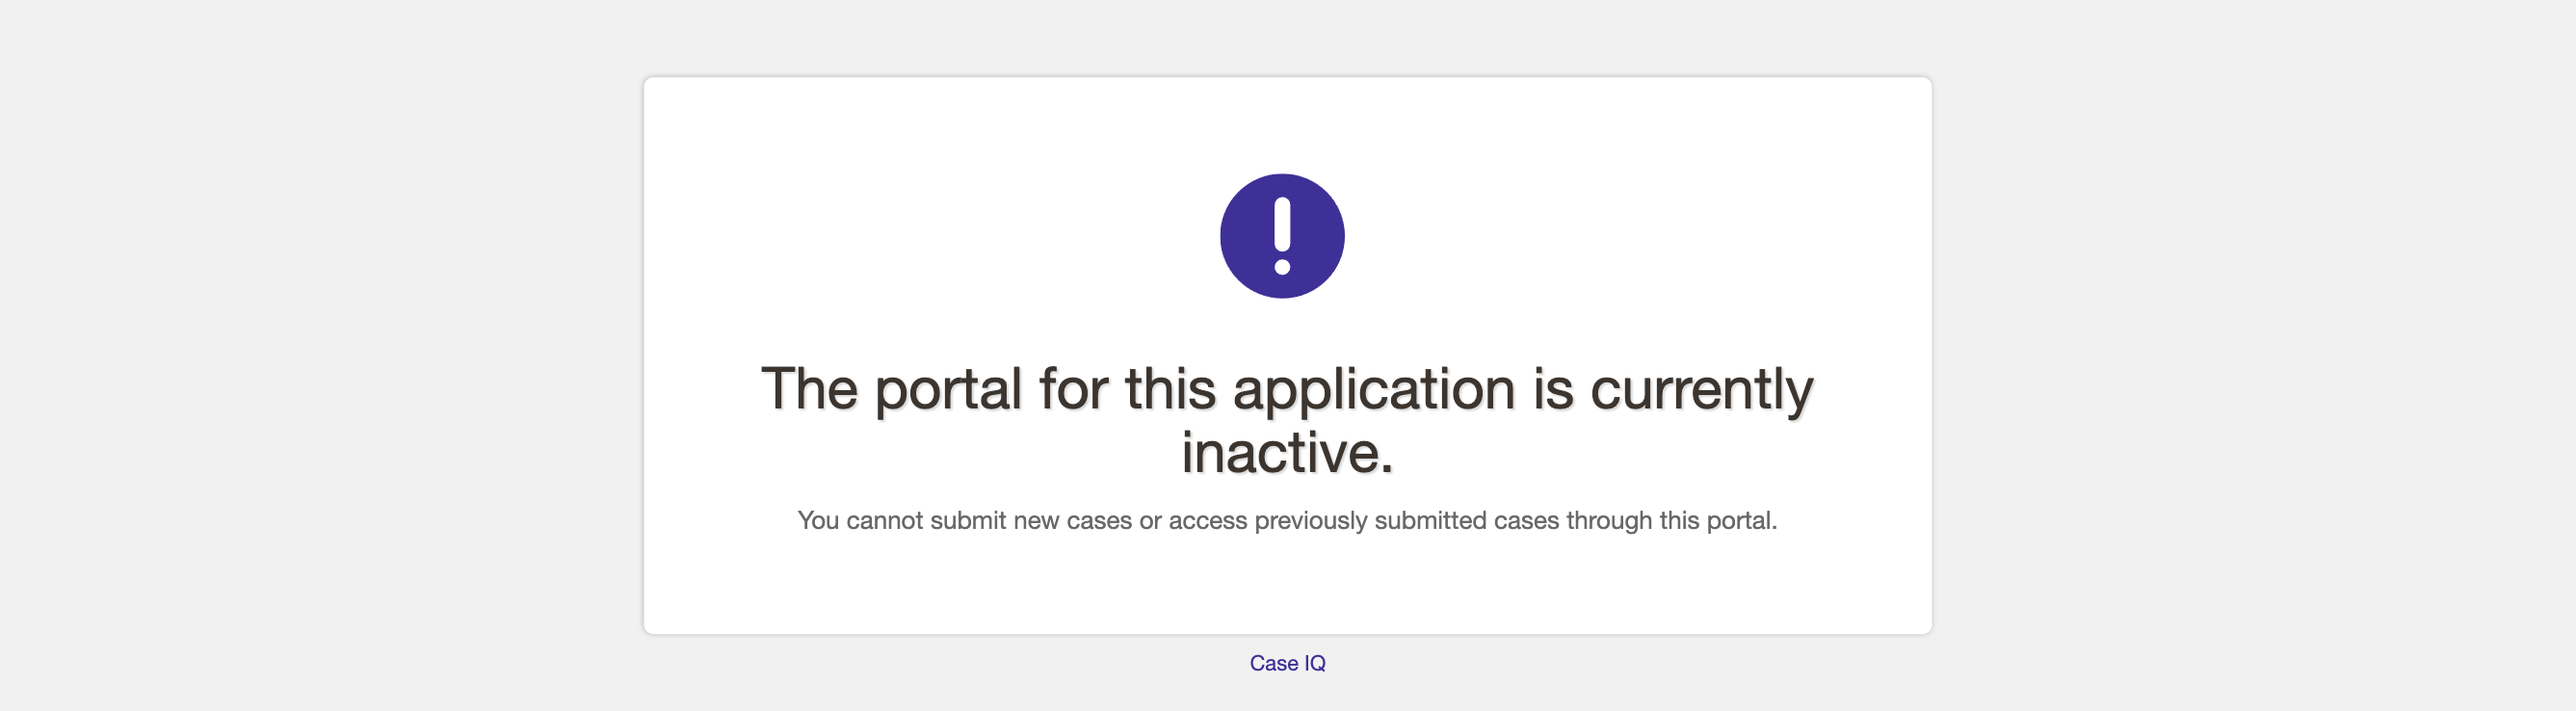
- The link to your external portal (e.g. https://[your company name].caseiq.app/portal) will load a blank page that explains that the portal is not active, shown in the screenshot below. If you would like to customize the text on this page, see the Change Inactive Portal Default Text section of this article.
- Reporters will no longer be able to access your external portal or submit cases.
- If your portal was two-way, any reporters who set up an account with an email address will receive an email letting them know that they cannot access or receive updates on their case anymore. You can customize the notification sent to reporters, see the Change Inactive Portal Default Text section for details.
- In the main version of your application, a banner will be displayed on external cases (i.e. cases originally submitted via the external portal), informing internal users that the reporter no longer has access to the case.
Update your External Portal's Configurations
To adjust your external portal's settings:
1. If your application has multiple languages, use the "Language" field on the External Portal Configuration page to select the version of the external portal to edit.

2. Click the Edit button in the Portal Configuration section.

3. You can now update your external portal's configurations. See a description of all configuration options in the sections below.
Online Form
Your external portal's online form (also called the "Report Online" and "external portal intake" form) allows reporters to submit cases to your organization by filling in and submitting a web form. After configuring these options, you can customize the fields available on the online form, see the Configure Forms and Fields to Show on Online Form section of this article for details.
- Allow Anonymous Submissions: allow external portal users to create an account with or without providing their name or email address. If you allow anonymous reporting, reporters can opt to create a username for their account instead of entering their name or email.
- Reporter Access to Submitted Cases: set your application's external portal as one-way or two-way. This option will only be available if your application was deployed with a two-way portal.
- Two-way portals allow external reporters to create an account when they submit a case via the online form, so they can log in to your external portal and see updates on their case.
- One-way portals only allow reporters to submit cases.
- Reporter Update Option: for a two-way portal, set if external reporters can choose to create an account when they submit a case or if creating an account is mandatory.
- Online Title: enter heading text for the online reporting option.
- Online Description: enter a description of the online reporting option, which will displayed below the "Online Title".
- Online Button Text: enter text for the button shown below the "Online Description".
- Online Terms and Conditions Title: enter the title of the online reporting's terms and conditions pop-up.
- Online Terms and Conditions Content: enter the text of the online reporting's terms and conditions pop-up.

See the labelled screenshots below to see where the "Online Title", "Online Description", "Online Button Text", "Online Terms and Conditions Title", and "Online Terms and Conditions Content" fields are displayed on the external portal.


Phone Reporting
When you enable phone reporting, you can display multiple phone numbers on your external portal, so reporters can call the hotline available in their region to submit a case. After configuring these options, see the Manage Dialing Instructions Options section of this article for details on adding phone numbers to your external portal.
- Enable Phone Reporting: activate or deactivate the phone reporting option on your external portal.
- Require Terms Before Dialing: show a terms and conditions pop-up when external reporters select the phone reporting option. If this option is enabled, they will not be able to see the Dialing Instructions page without accepting the terms and conditions.
- Phone Title: enter heading text for the phone reporting option.
- Phone Description: enter a description of the phone reporting option, which will be displayed below the "Phone Title".
- Phone Button Text: enter text for the button shown below the "Phone Description".
- Phone Terms and Conditions Title: enter the title of the phone reporting's terms and conditions pop-up.
- Phone Terms and Conditions Content: enter the text of the phone reporting's terms and conditions pop-up.

See the labelled screenshots below to see where the "Phone Title", "Phone Description", "Phone Button Text", "Phone Terms and Conditions Title", and "Phone Terms and Conditions Content" fields are displayed on the external portal.


Email Reporting
You can provide an email address to reporters on your external portal by enabling email reporting. If a reporter chooses to submit their concern via email, the email address you set will be loaded in their preferred email client (e.g. Microsoft Outlook or Gmail).
- Enable Email Reporting: activate or deactivate the email reporting option on your external portal.
- Portal Submission Email Address: set the email address to which to send email reports from the external portal.
- Email Title: enter heading text for the email reporting option.
- Email Description: enter a description of the email reporting option, which will be displayed below the "Email Title".
- Email Button Text: enter text for the button shown below the "Email Description".

See the labelled screenshots below to see where the "Email Title", "Email Description", and "Email Button Text" fields are displayed on the external portal.

Landing Page Content
In this section, you can adjust the text at the beginning of your external portal landing page to encourage reporters and welcome them to raise any concerns to your organization.
- Welcome Heading: enter text to display at the top of the portal landing page. We recommend a brief greeting to reporters.
- Introduction Text: enter the text to display below the "Welcome Heading". We recommend explaining how reporters can use the external portal and what they can expect after submitting a case.
- Reporting Section Heading: enter the heading text displayed above the available reporting methods.
- Reporting Section Description: enter a description of the available reporting options. We recommend providing guidance to reporters on how they can choose a reporting method for their concern.

See the labelled screenshots below to see where these fields are displayed on the external portal.

Custom Privacy Policy
In addition to Case IQ's standard privacy policy, you can link to an additional privacy policy on your external portal as needed.
- Custom Privacy Policy: activate or deactivate a link to a custom privacy policy on your external portal.
- Organization Name Display: enter the text to display beside your custom privacy policy link.
- Custom Privacy Policy Link Text: enter the text to use as the link to your privacy policy.
- Custom Privacy Policy Title: enter the title text for your custom privacy policy's pop-up.
- Custom Privacy Policy Content: enter the text of your custom privacy policy's pop-up.

See the labelled screenshots below to see where these fields are displayed on the external portal.


Appearance
- Portal Theme: choose the color theme for the external portal. In addition to the theme you set here, portal users will be able to toggle to an accessible theme as needed. See Add, Edit, or Delete a Color Theme for details on managing your application's themes.
- Header Logo Link: choose if reporters will be navigated to your external portal's landing page or a custom link when they click the logo in your external portal's top bar. If you select "Custom URL", a text box will appear for you to enter a link.
- Banner Placement: display a portal banner above or below the welcome message, i.e. the "Welcome Heading" and "Introduction Text" on the external portal landing page (see "Landing Page Content" section above). Your organization can use a banner to display information on your corporate culture and compliance programs, see Manage the Banner on your Portal for details.

4. You can save and preview your changes before publishing them to the external portal. Click the Save button to put your portal configurations into "Pending Changes" status.

Then, click Preview to open a preview of your external portal with your pending changes in a new tab.

After previewing your changes, you can click Edit to make more adjustments or click Publish to use the new settings in your external portal. If you publish your portal configurations while your external portal is inactive, the portal will remain inactive.

Configure Forms and Fields to Show on Online Form
You can configure the information that reporters provide about their concerns by choosing the fields available on the form. You can add fields from the case, party, and file forms, as well as any custom forms in your application to your external portal's online intake form.
The internal intake form, hotline intake form, and external portal intake form are separate, so you can select different fields to appear on each form. In the example below, the "Facility Location" case field only appears on the external portal's intake form.
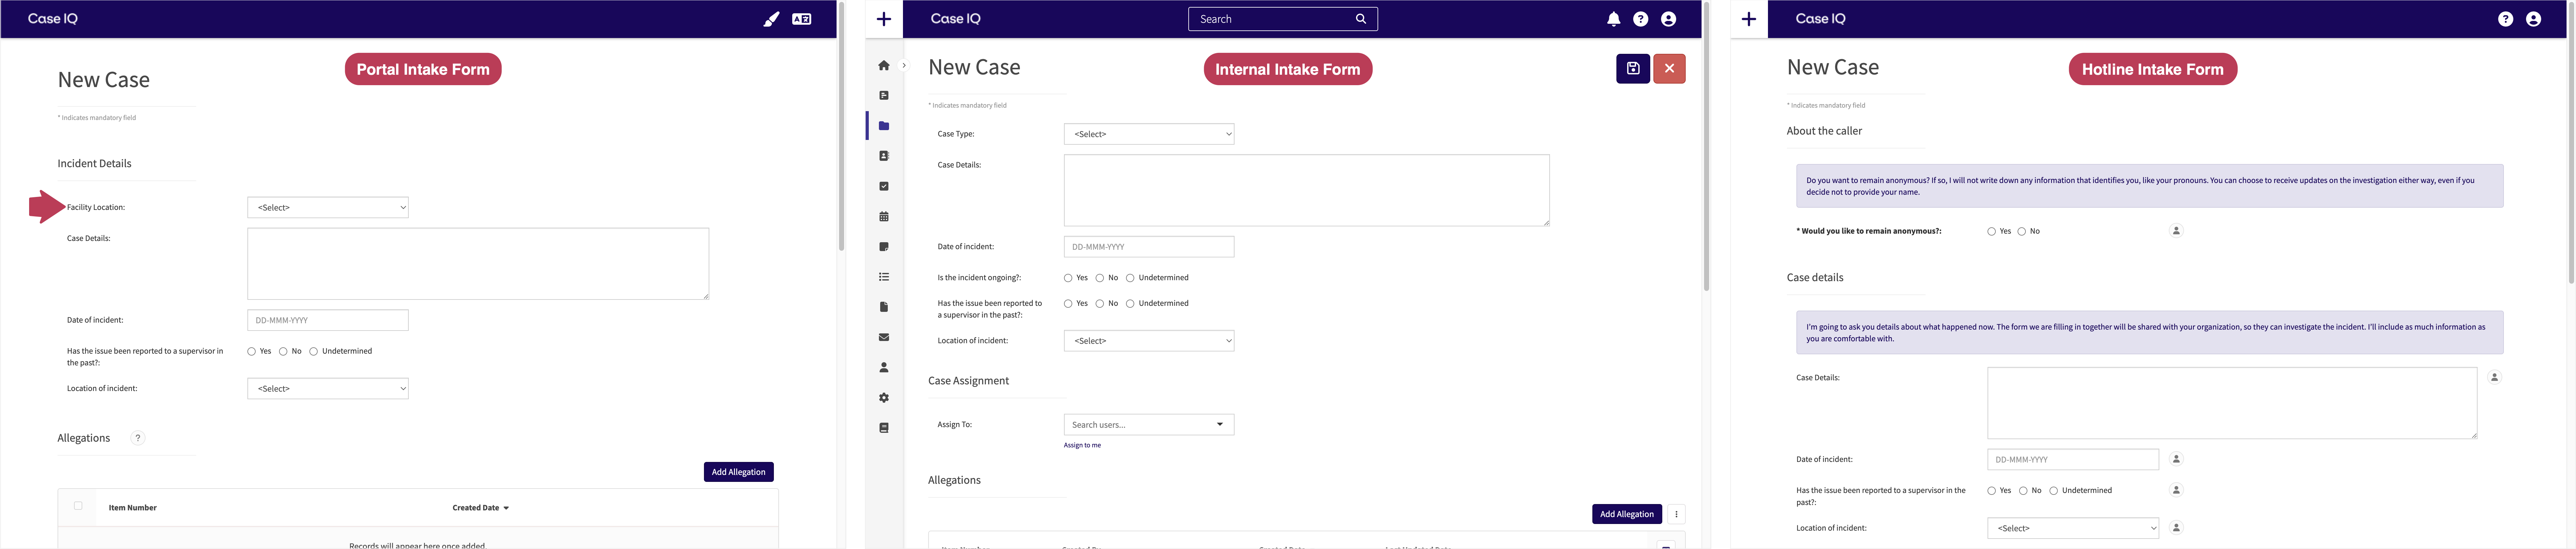
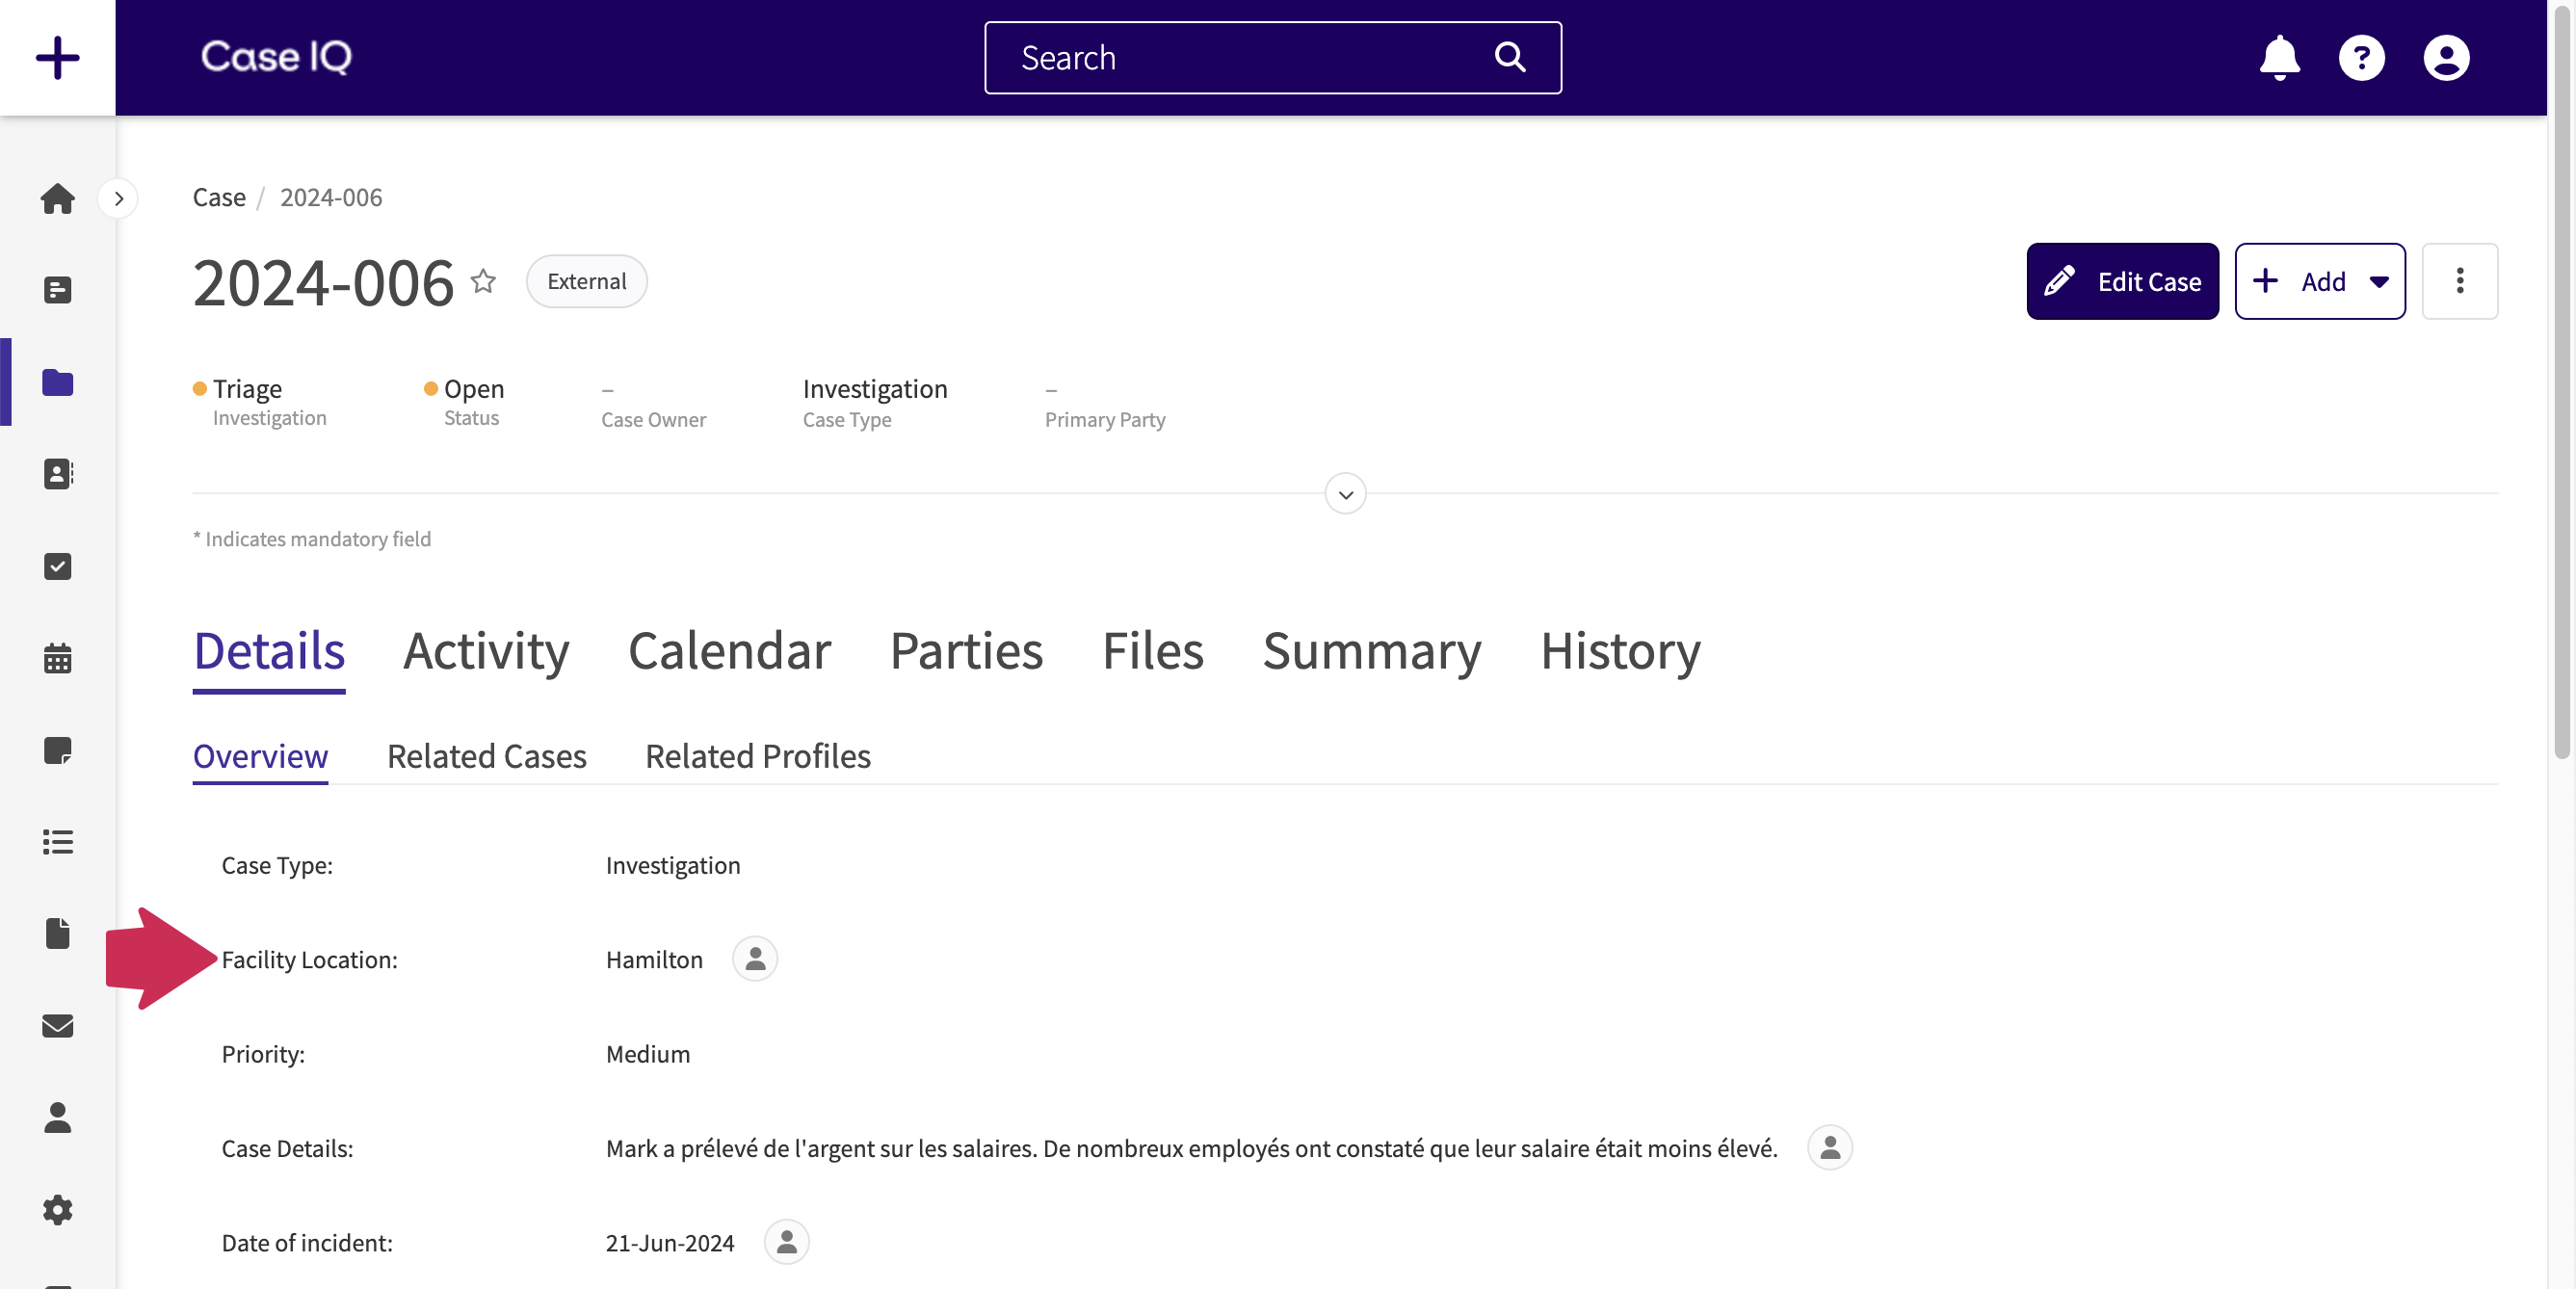
However, fields from all intake forms will appear on the form's page after intake, unless you apply display rules to only show the field under specific circumstances (see Use the Form Builder: Set Up a Display Rule). For example, "Facility Location" will be displayed on the case's page after the reporter submits the case.
Choose the fields to show on the external portal's online intake form using the following steps:
1. Navigate to Settings > Forms. Click the case, party, file, or custom form row in the Forms grid to open it in the Form Builder.

2. Click the Edit button on the Form Builder.

 ) beside the form's name in the Form Builder.
3. To show or hide an existing field on the external portal:
- Click a field on the form.
- On the field properties sidebar, use the “Show on the external portal intake form” toggle to show or hide the field on the external portal version of the form.
- Click the Save button on the field properties sidebar to update the field.

4. To add a new field to show on the external portal:
- Click the + Insert Fields button or the right arrow icon to open the Field Type sidebar.
- Select the type of field you want to add to the form in the Field Types sidebar. Click and hold the field type, drag it to the Form Builder page, and let go of your cursor over the “+ Insert Fields” section.
- Fill in the Field Type pop-up form (see details on all field properties in Use the Form Builder), making sure to turn on the “Show on the external portal intake form” toggle.
- Click Save in the pop-up.

5. Publish the form to make your changes available on the external portal.

Show or Hide a Picklist Option on the Online Form
You can control the picklist options available on your external portal, meaning you can choose to show some of a picklist's options to users on the portal but hide others.
To manage the options shown for a picklist field on the external portal, use the following steps:
1. Navigate to Settings > Forms. Select the picklist's form to open it in the Form Builder.

2. Click the Edit button in the Form Builder.

3. Click the picklist field on the form.
4. Make sure the "Show on the external portal intake form" toggle for the picklist field is turned on. If you needed to turn it on, click the Save button at the bottom of the form properties sidebar.

5. Click the Values tab on the field properties sidebar.
6. You can now manage the picklist's options in the Values tab:
- To show or hide an existing option for the picklist on the portal, click an option in the grid.

- To add a new option for the picklist to show on the external portal, type the text you want to show in the picklist dropdown menu and hit Enter or Return on your keyboard.

7. Turn on the “Show on the external portal intake form” toggle for the picklist option. Then, click the Save or Add button above the grid.

8. Close the sidebar. Publish the form to make your changes available on the portal.

Hide Static Party Fields on Portal
You can control the information collected about people on your organization's portal in your application's settings. This means you can:
- Ensure investigators only receive information relevant to their work.
- Hide personally identifiable information (PII) from reporters.
- Use the party form to capture companies or organizations, rather than specific people.
You can remove or hide any fields your organization has added to the party form using the Form Builder, see Edit a Standard Record Type for full instructions. However, you can hide Case IQ's standard, out-of-the-box fields, called "static fields", from the application's Options page.
To hide static party fields for reporters:
1. Navigate to Settings > System > System > Options.

2. Narrow down the options displayed in the grid by clicking the Search button and typing “party”.

3. Find the "partyFormStaticFieldsHideAfterSubmission" and "partyFormStaticFieldsHideOnIntake" options in the grid.
4. Click the dropdown in the Value column for these options. Then, select the static party fields you want to hide after submission or on intake.
- partyFormStaticFieldsHideAfterSubmission: hide static party fields after the reporter submits the case, so reporters can fill in these fields when creating a case but cannot see them if they log in to view the case.
- partyFormStaticFieldsHideOnIntake: hide static party fields on the portal when creating a case, so reporters will not be able to see or fill in these fields when adding a case.

5. Click the Save button.

6. Click "Yes, Hide" in the "Hide fields after submission" and "Hide fields on intake" pop-ups.

7. Click "Confirm" on the "Change configuration options" pop-up. Your changes will take effect within 15 minutes.
Manage Dialing Instructions Options
You can display multiple phone numbers on your external portal, so reporters can call the hotline available in their region to submit a case. You can manage the phone numbers shown on your external portal from the Dialing Instructions page. To navigate to the Dialing Instructions page, go to Settings > System > Portal > Dialing Instructions.

Reporters can see these phone numbers when they click the Dialing Instructions button on your external portal.

Add Dialing Instructions
Before you can add dialing instructions, your application must have options for the "Dialing Regions" picklist. You can skip the "Add "Dialing Regions" Options" section below if you can select a region on the Dialing Instructions form:

Add "Dialing Regions" Options
1. Navigate to Settings > Forms > Picklists.

2. Click the "Picklist" filter. Select "Dialing Regions", then click the Done button.

3. Click the Add Dialing Regions button.

4. On the Dialing Regions form, you will see the following fields:
- Value: enter the region name.
- Sequence: you can enter a number to set the option's order in the picklist. If you do not enter a sequence number the options will be ordered alphanumerically.
5. When you have completed the "Value" and "Sequence" fields, click the Save button or select Save and Copy in the Options ( ) button menu to add another option.

To add your hotline number to your external portal:
1. Navigate to the Dialing Instructions page under Settings > System > Portal.

2. Click the Add Dialing Instructions button on the Dialing Instructions page.

3. Complete the following fields on the New Dialing Instruction form:
- Region: select the location of the hotline phone number. You will see the "Dialing Region" options in this picklist. This will be displayed on the portal, so reporters can find the correct phone number to call for their area.
- Phone Number: enter the hotline's phone number.
4. Click Save when you have filled in the form.

Edit Dialing Instructions
To update dialing instructions:
- On the Dialing Instructions page, click the phone number you want to edit.
- Click the Edit button on the phone number's page.
- The page will now be in edit mode. Use the text boxes to update the information in the form fields.
- When you have completed your changes, click the Save button.
Delete Dialing Instructions
You can delete a set of dialing instructions from its page. Click the Options () button on the dialing instruction's page, then select the "Delete" option.
You can also delete multiple sets of dialing instructions from the Dialing Instructions grid. Select the checkbox for each row you would like to delete, then click the Delete button above the grid.
Allow External Access to Records
After a reporter submits a case via the external portal, your investigators will pick up the case and document their findings by updating and adding records to the case, like notes, parties, and files. Investigators can share those records with the case's reporter if they have "Set Reporter Access" permissions. To grant this permission to a user role:
1. Navigate to Settings > Access > User Roles. Select a user role in the User Roles grid.

2. Click the Edit button.

3. Open the "Edit" permissions for files, notes, or parties. Then, click the "Set Reporter Access" permission. There are separate “Set Reporter Access” permissions for files, notes, and parties so you can choose the specific record types the role can share with reporters.

4. Click the Save button.

5. All users with this role will now see the “Allow Reporter Access” checkbox on an external case's parties, files, and notes forms.

Change Inactive Portal Default Text
When you deactivate your external portal, the link that previously led to the external portal will now load the following message: "The portal for this application is currently inactive. You cannot submit new cases or access previously submitted cases through this portal."
If you would like to change or add more information to this message, you can update its translation using the following steps.
1. Navigate to Settings > Data > Translations. In the Translations grid, search for the key "portal_disabled_text".

2. In the "Translation" column, enter a new message to display on the inactive portal page.

3. The system will automatically save your changes when you click outside the “Translation” text box. The text you entered will now be displayed on the inactive portal page.
If you are switching your portal from two- to one-way, you can also edit the email message that the system will send to reporters who set up an account with an email address.
1. Navigate to Settings > System > Communications > System Notifications. Search for and select the "Notify Reporter Portal System Option Changed" notification in the grid.

2. On the notification's page, set the "Language" field to the language you want to edit.

3. Click the Edit button.

4. Enter the message you want to send to reporters in the "HTML Body" and "Text Body" fields.

5. Click the Save button.
FAQ
What is the difference between a one-way and a two-way portal?
Your organization can use your external portal's online form to both receive case information from reporters and provide updates to them.
- A one-way external portal only allows reporters to submit cases. They cannot receive updates on their case via Case IQ.
- A two-way external portal allows reporters to set up an account for your external portal, so they can log back into the external portal and see updates on their case.
What happens when you deactivate a portal or switch it to one-way?
If you deactivate your portal:
- Reporters will no longer be able to access your external portal or submit cases.
- The link to your portal will load a blank page that explains that the portal is not active, shown in the screenshot below. If you would like to customize the text on this page, see the Change Inactive Portal Default Text section of this article.
If you switch your portal from two- to one-way:
- Any reporters who set up an account with an email address will receive an email letting them know that they cannot access or receive updates on their case anymore. You can customize the notification sent to reporters, see the Change Inactive Portal Default Text section for details.
- In the main version of your application, a banner will be displayed on external cases (i.e. cases originally submitted via the external portal), informing internal users that the reporter no longer has access to the case.
Can I deactivate the online form on the external portal?
You cannot remove the online reporting option from your external portal. If your organization is no longer accepting online reports, you can deactivate your external portal.
Do I need to manage external portal user accounts?
System administrators do not need to manage external accounts, as Case IQ automatically handles external account management. External accounts:
- Do not appear on the User Profiles page, nor will they be visible anywhere in the application. If the reporter chose to identify themselves, their information will appear in the “Reporter” party created for the case.
- Do not count towards an application’s user account limits.
- Will be automatically deactivated after a set number of days of inactivity (by default 90 days). If the reporter made their account using an email address, they will be notified in advance of their account’s deactivation.
How can I ensure reporters provide their contact information? Our organization is required to contact reporters
We recommend using the following settings for your external portal, which will ensure that reporters provide their email address when they submit a case via the external portal intake form.
- Turn off the "Allow Anonymous Submissions" toggle.
- Set the "Reporter Access to Submitted Cases" setting to "Two-Way".
- Set the "Reporter Update Option" setting to "Is mandatory".

What do the portal settings on the Options and Translations pages do?
In addition to the External Portal Configuration page, you can manage your external portal's settings from the Options page (Settings > System > System > Options) and Translations page (Settings > Data > Translations). If you update settings on the External Portal Configuration page, your changes will be synced to the Options and Translations pages and vice versa. All related settings in Options and Translations will be locked when your changes are pending on the External Portal Configuration page to prevent overwrites. We recommend using the External Portal Configuration page to manage your portal's settings for ease of use.